|
More ATC/ACEO Sketches
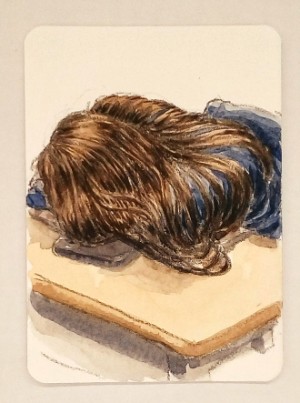
I have had a lot of fun sketching sleeping students, so I decided to try it on trading card-size paper. This makes it easier for me to quickly pull out a card and start sketching as soon as I land on a subject. The cards are so small that even when I'm reading vocabulary words aloud from a hand-out for the students to repeat, nobody knows I'm holding a sketch card.
This has resulted in a dramatic increase in the number of sketches I produce every day (remember I hadn't been sketching much at all for the previous several months). Suddenly I have so many sketches, that I groan to think about scanning them and putting them here on this page. So here is a pile of some of them. You can click on the image to see a larger one if you really want to look at these in detail.
It's no secret that our best sketches are based on our passions. My favorite subject is people, and some of my favorite people are my students. I don't think I'll ever tire of sketching them.
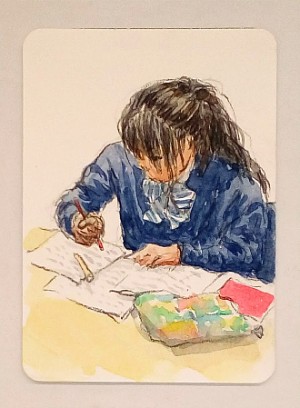
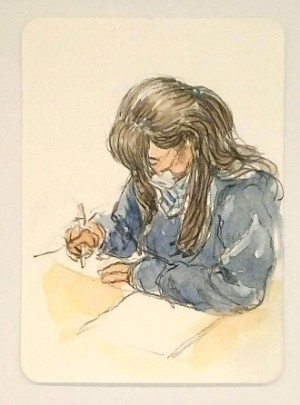
Maybe you noticed that one of the students is not sleeping. I have recently decided to give these sketches to the models after I have taken a photo of the sketch for my own reference (or for this web site), but the resulting scenario was that only the sleeping students got rewarded with a sketch gift while those who managed to stay awake during the lessons were passed over. This was clearly not fair, so I decided to take up the challenge of sketching the other students who were awake. Although this results in a few false starts when students change poses and don't return to the original pose, it is also a good challenge which will help me improve my sketching ability.
Since the students look forward to receiving these sketch cards, I can't afford to let the cards accumulate to the point where I can photograph a pile of them; the students can't wait that long. So I have to take photos of the sketches soon after they are produced.
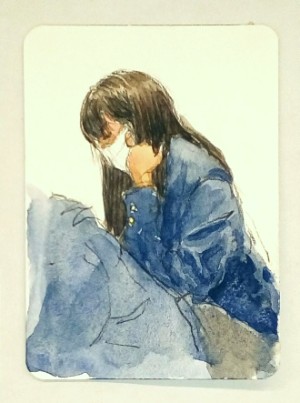
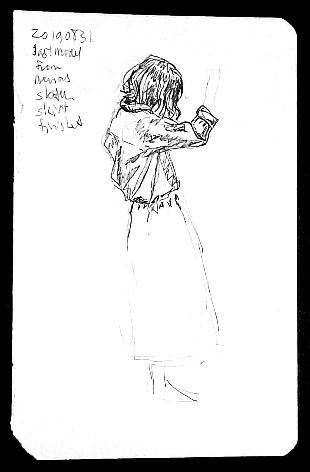
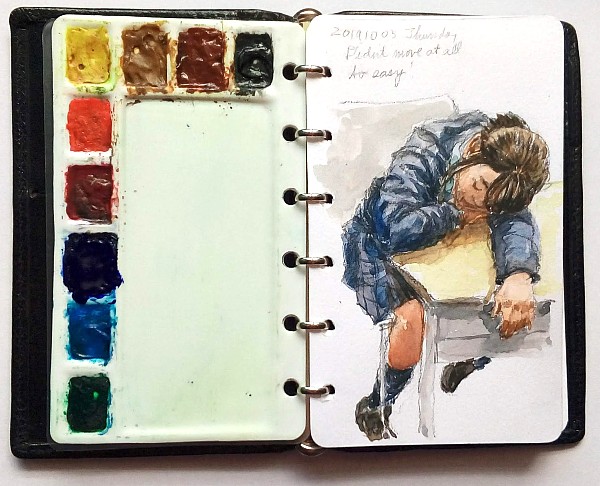
You may notice that these are all girls. I sketch the boys also, as you can see in the pile of sleeping sketches above, but I think my sketches of girls in the most recent batch turned out nicer. And I admit that I prefer sketching girls if I have a choice because they make for more graceful sketches in my opinion. For example, the sketch of the sleeping girl with all that beautiful flowing hair was especially gratifying to draw, and I had about 20 minutes to draw her because she did not move at all.
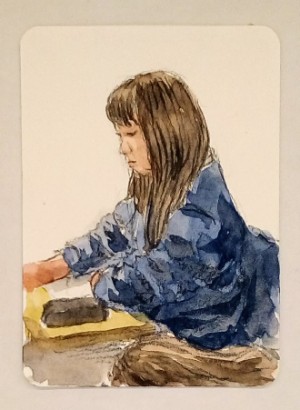
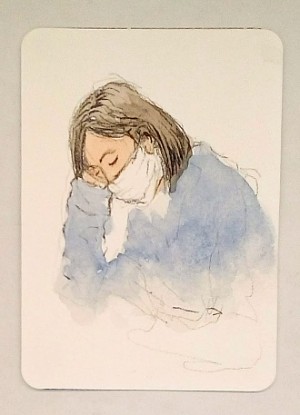
The next sketch actually ended early when the model completely changed her pose soon after I started, but I like how it turned out. So I deliberately ended my next sketch early as well to keep the coloring light and let the pencil lines show through.
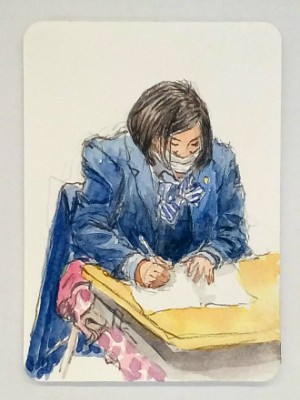
You may also be wondering about the surgical masks. These are so common in Japan that I don't even notice them even when I am sketching them! They are for preventing the spread of germs in crowded Tokyo, and are a sign that the wearer has caught a cold -- or does not want to catch a cold from others.
Fat 2mm drafting leads for sketching
For these sketches I used my Kita-boshi (North Star in English) OTONA NO ENPITSU  (Adult's pencil in English) or my OHTO Mechanical "Sharp" pencil (Adult's pencil in English) or my OHTO Mechanical "Sharp" pencil (in Japan they call mechanical pencils sharp). The company name, OHTO comes from the English auto for automatic, for the way the lead advances. (in Japan they call mechanical pencils sharp). The company name, OHTO comes from the English auto for automatic, for the way the lead advances.
Both use standard 2mm drafting pencil leads which allow me to get expressive line variation. And both advance the lead in increments by clicking on the end like a regular mechanical pencil, so I don't have to dirty my fingers adjusting the length of the point. The lead is 2B in both pencils.
I started using the OHTO again after I noticed an old Moleskine Volant notebook on my shelf and flipped through it to see if I had ever used it. I was surprised to find three pencil sketches that I had done on the subway a few months ago. I have no recollection of drawing these.
Many artists will tell you that when they look at a sketch they had done, they can vividly recall all the details and sights and sounds and smells from the moment they made the sketch. I must be hopeless because I can't even remember making these sketches!
I also noticed that I had written in the notes that I had used my "fat green OHTO sharp" to draw these.
I really liked the way these sketches turned out so I dug around my supplies and found that pencil.
I always liked this pencil because it's shorter and fits better in the shirt pocket than the Kitaboshi. It also has a nice big eraser -- and replacement erasers are available. It is also my favorite color, dark green.
The reason I wasn't using it regularly was because it had no clip. So I stole a clip from one of my Microns (in Japan Microns have dark blue bodies with gold colored clips) and now it goes with me everywhere. I love how this pencil feels, and of course, I love the line variation.
I've seen on the web that OHTO now makes a version of this pencil with the clip, but it's sold out and impossible to find right now even in Japan. Apparently these pencils are so popular here that when it was finally available with a clip, it resulted in a feeding frenzy.
I must admit that it didn't occur to me until much later that I really don't need a clip at all for such a short, fat pencil. It can go in my front pants pocket with no discomfort, and with no chance of getting damaged.
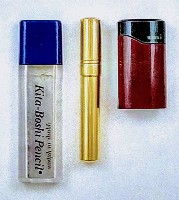
I also got a brass lead pointer for this pencil (the one in the center in the photo below). The pointer is also made by OHTO. for this pencil (the one in the center in the photo below). The pointer is also made by OHTO.
I already owned the wonderful Uni Lead pointer (the one on the right in the same photo) which is very precise and portable, and the point is very tapered and sharp, and so it remains sharp for a long time. (the one on the right in the same photo) which is very precise and portable, and the point is very tapered and sharp, and so it remains sharp for a long time.
You may wonder why I felt I needed a new lead pointer, other than the fact that I am attracted to bright shiny objects.
Well, in my case, I like to have a sharp point only at the beginning of the sketch when I'm blocking in light guide lines.
Then I would rather have the pencil point go dull soon after I make those preliminary lines so I can take advantage of those expressive lines that a fat 2mm lead can get.
I found that a less tapered point will allow this to happen quicker.
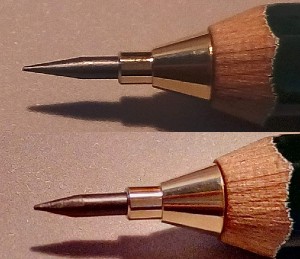
The OHTO lead pointer makes such a less-tapered point. It has four blades which are part of one metal unit inside the sharpener.
You can see the difference between the two points in the photo below. The sharper Uni point is on top, and the less tapered OHTO point is below it.
The Kita-boshi (North Star) sharpener which comes with the Kita-boshi OTONA NO ENPITSU (Adult's pencil) which comes with the Kita-boshi OTONA NO ENPITSU (Adult's pencil) also has the same type of blades as the OHTO and also makes a less tapered point. also has the same type of blades as the OHTO and also makes a less tapered point.
The KITA-BOSHI sharpener is also in the photo above. Yeah, I have all three.
Of the three, the OHTO lead pointer takes the least amount of space in the pocket and is the most portable. And the cap is the most secure since it is threaded, and screws on.
The Uni cap stays attached and swivels open, and the KITA-BOSHI cap is held in place by friction, and simply pulls off.
Both the Uni and KITA-BOSHI have opened in my pocket before.
While all three work great, the OHTO lead pointer is the safest to carry in the pocket.
However, when sharpening pencil leads, the point will often break inside the sharpener. This happens most often in the Uni sharpener because it makes a longer, tapered point which is more fragile. With both the Uni and the OHTO, you can't see what's going on, and if you can't dislodge the broken lead tip by banging the sharpener on a hard surface, then you are stuck without a means to sharpen your pencil. When things go wrong, the transparent KITA-BOSHI is your best friend because you can see the problem and deal with it. Transparency is usually a good thing.
Sketching on index cards
Anyway, back to those three sketches; they took me by surprise, and I was impressed by them. I don't remember drawing them, but I recognize my own handwriting and drawing style. What impressed me the most was the nice line work I could get from these fat pencil leads, and how I thought they looked great as they are without any color.
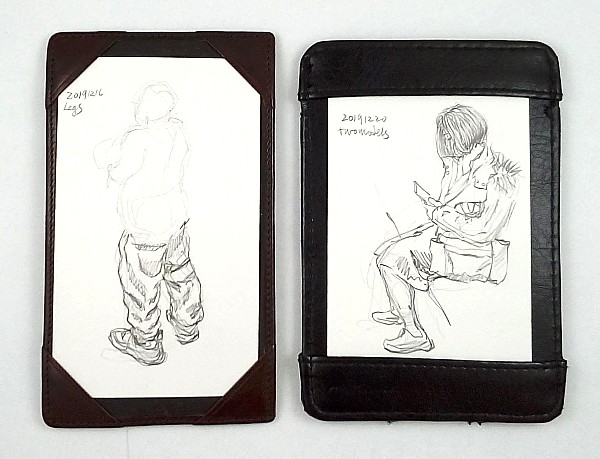
So I decided to do more pencil sketches of people on the subway with just pencil and paper. This time I slipped a leather jotter full of unruled index cards into my pocket for the evening commute from work. The morning subway is too packed with people to do anything like sketching.
(Click on the image to see a larger one)
As always, people on the subway come and go very quickly, and are often blocked by new passengers before I have time to finish the sketch, but I didn't want to scribble quickly just to capture them before they disappeared. I don't enjoy making scribbles or looking at my scribbles afterwards.
Nor did I want to finish the pose from imagination because they can end up looking cartoony and shallow and a little embarassing.
Apparently the place in my head where imaginary images are supposed to reside is a barren wasteland.
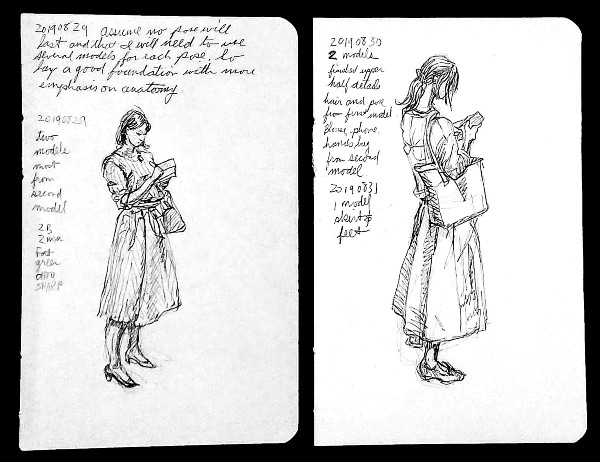
As a result, many of the sketches remain unfinished, waiting for a new model in a similar pose to supply the missing parts. If you compare the girl in the photo above with the photo above that, you'll notice she got a new coat and bag -- from somebody who came along later.
This problem of poses and models suddenly disappearing is always my biggest challenge when sketching subway commuters.
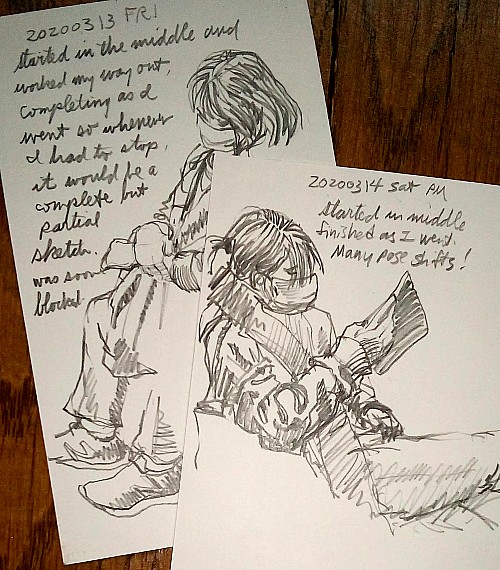
Another way of handling this problem is to simply start drawing somewhere in the middle of the paper some small portion of the pose -- whatever catches my attention -- with no preliminary under-drawing, and expand outward, finishing each part as I go so that when the pose vanishes, I still have something to show for my efforts; a partial but complete sketch as far as it goes.
With this approach, I don't have to wait for an unobstructed view of an entire body before I start sketching; I can jump right in and draw whatever is visible.
On both of these sketches, I started with one of the hands. The girl on the right was particularly a challenge because she was very restless and kept moving and switching the phone between her right and left hand. Fortunately her head didn't move much, and I think the sketch reflects that.
I kinda liked this way of sketching. It was more relaxing because my goal had shifted away from including as much as possible while the pose was in front of me to simply producing a nice sketch -- even if it only takes up a tiny space and depicts only a portion of the model. This time I decided to not add body parts from other commuters to create Frankenstein models. Surprisingly, these two attempts turned out to be fairly complete anyway.
The simplicity of index card sketching is very attractive; one card and a pencil. And the smoothness of index cards is perfect for my style of sketching which relies on crisp line work.
Jotters for sketching
Also, I really love my jotters. They are the same size as smart phones which practically everyone else on the subway is using, and if they happen to glance up at me while I'm sketching them, they'll just assume I'm absorbed in my smart phone as well, and not give me another thought. The jotter on the left was bought at a department store (Maruzen) in Tokyo and it is real leather and was a little expensive, but I got it as a birthday gift (to myself).
The jotter on the right is an Oxford At-Hand Note Card Case . It's not real leather and is much cheaper. I prefer it over the more expensive one. . It's not real leather and is much cheaper. I prefer it over the more expensive one.
It holds a surprising amount of cards, and has an open card holder on the back for random notes and "to-do" and "to-buy" lists which I can check at a glance. This feature compels me to keep it in my pocket at all times. The drawing area is more square than the other jotter because the card is tucked in at the ends rather than at the four corners, and I like this design better because changing cards is much quicker and easier. I think I'll start using that hidden area for notes and dates so they will be consistent from card to card. By the way, the Oxford jotter came with a pen loop which I clipped off because I carry the jotter in my pocket, and don't find loops useful.
It looks like I'm really coming around to embrace loose cards for sketching.
In the past, I have always preferred nice hardbound sketchbooks because they become an ongoing project which increases in value as they fill up with sketches, and this in turn keeps the sketching motivation high. But the value of cards is their flexibility and portability; what can be more portable than a card? This portability is the main factor that determines whether or not I sketch in many situations.
Index cards are relatively inexpensive and can be purchased in bulk packs of 1,000 cards so each card is but a fraction of the cost of similar size pages from sketchbooks and notebooks because you are not paying for the binding process. That gives me a little more freedom to risk wasting a card and take a chance on a subject which might disappear before I've had a chance to draw more than a few lines.
If I plan on giving away sketches then they have to be on loose cards or paper. Several times in the past when I have been sketching in Tokyo, passers-by have offered to buy the sketches on the spot, but I had to turn them down because I was using a hard-bound sketchbook.
There are cheap photo albums with clear plastic sleeves that take 3X5 cards so I can keep the completed sketches together in a book if I want to have that sketchbook feel later. Sketchbooks are great for storing and displaying sketches, but not so convenient during the actual sketching process.
Although 3 x 5 inches is not a standard size here in Japan because we are on the metric system, similar index cards are readily available at local stationery shops where they are apparently used for studying for exams. 3 x 5 inches come out to 76.2 mm x 127mm, but in Japan the common size for these cards is rounded down to 75mm x 125mm, and they retain the exact 3x5 ratio. In Japan they are called 5x3 cards or Jouhou cards which basically means "information" cards.
Incidentally, 3 x 5 inch index cards are only slightly smaller than pocket Moleskine pages which measure 3.5 x 5.5 inches (90mm x 140mm).
A ring binder for index cards
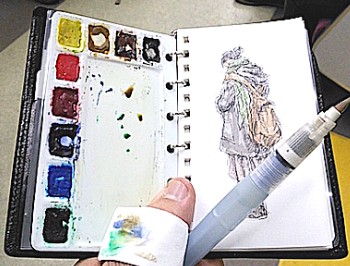
For pencil sketches I find jotters with smooth index cards very useful. But for watercolor sketches I use a ring binder with textured sketch paper pages that can take watercolor. This binder (a.k.a. planner, organizer, notebook etc) has six rings and is called mini 6 in Japan. In the west it would be pocket size.
By the way, 5 ring binders are called mini 5 in Japan, and the spacing between the holes in all Japanese binders from center to center is the universal standard of 19mm.
The standard paper size for mini 6 binders in Japan is 80mm X 126mm which is slightly wider than a 3 X 5 inch index card which is 76.2 mm x 127mm.
But the Japanese company RayMay which produces the Davinci line of products makes their mini 6 pages 76mm x 126mm which is practically identical to 3 X 5 inch index cards.
Perhaps RayMay wanted their mini 6 pages to be compatible with the ubiquitous 6-ring 3 X 5 inch memo binders in the west (such as the ones made by
Mead ), or maybe they simply started out with the standard 3 x 5 inch card size and decided to stay with that format. ), or maybe they simply started out with the standard 3 x 5 inch card size and decided to stay with that format.
I discovered cheap vinyl Mead 3 x 5 memo binders in the early 1980s and brought a few to Japan with me and used them until I discovered their slim leather Japanese cousins from RayMay and started using them for watercolor sketching.
Since the RayMay mini 6 pages are 3 x 5 inches, they can also be carried loosely in card jotters just like index cards, the big difference between them and index cards being the thickness and the holes along the sides.
I love the 3 x 5 inch format for watercolor sketches, but don't particularly like having holes along the sides. As a matter of fact, before I gave the above sketch to the model, I trimmed it down to trading card size, mainly to get rid of the holes -- which was a horrible mistake.
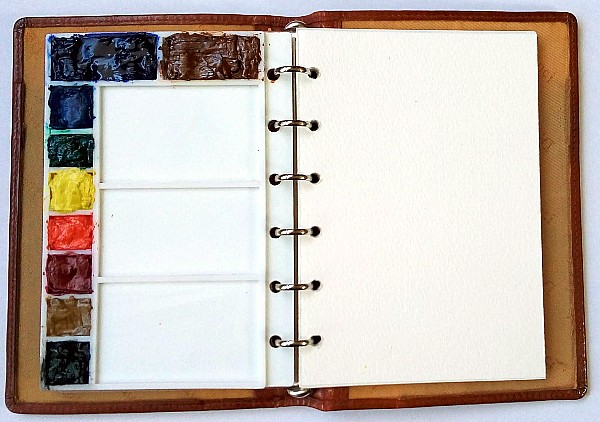
So I took a wider ring binder which I'd had for over fifteen years, and made a watercolor palette for it. This binder accepts 3.5 inch wide paper which means I can trim them down to 3 x 5 inches and still have a standard index card size sketch after I'm done.
For this palette I did not use the vacuum form method (for which I have apparently gained a little notoriety on the web) but chose the simpler method of gluing 2x2mm plastic (polystyrene) beams onto a 1mm (0.40 inch) thick plastic (polystyrene) base with model glue. It worked out well. I even gave more space for Ultramarine and Burnt Sienna which get depleted sooner than the other colors.
If the color surfaces look a little rough, its because I scraped and scooped the paints from old palettes which had been retired. I don't like to waste watercolor paint.
For the polystyrene sheets I used a generic brand I found in Tokyo, but in America, you can use LITKO plasticard . For the 2mm plastic beams I used Tamiya . For the 2mm plastic beams I used Tamiya . .
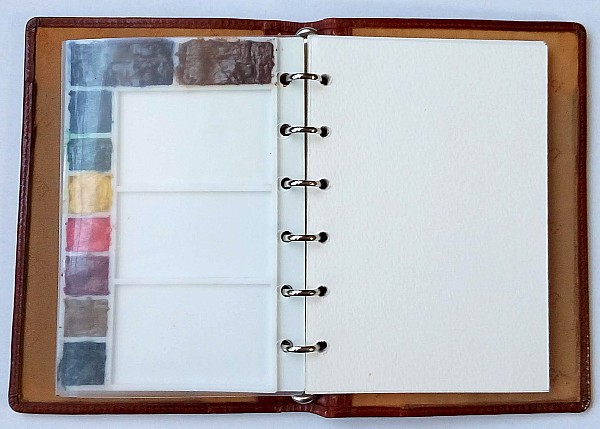
Like the smaller notebook, this has a fold-over cover to protect the pages from the paint in the palette, which you can see in the photo above. It's made out of a sheet of thin plastic folded in half. I cut the plastic out of a clear soft plastic folder.
When I'm using the palette, I close the cover back on itself, and tuck it out of the way under the palette. The surface of the cover which touches the paint still faces inward, so no paint accidentally gets transferred anywhere outside the cover.
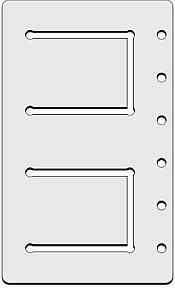
To keep the cover in place, I punched holes along the sides so it would attach to the rings.
The holes on the bottom half (right half in the photo below) anchor the sheet to the notebook, and holes on the top half (left half in the photo below) have small slits so I can open it easily without unclasping the rings.
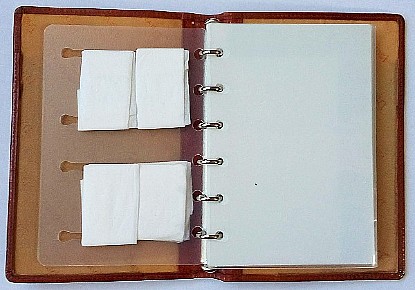
This project presented one more challenge: I had removed all the flaps and pockets from this notebook a long time ago (seemed like a good idea at the time...) so there was no place to store the tissue rings which go on my thumb.
In case you don't know about the thumb tissue rings, here's a photo of me using one on the subway. I wipe my water brushes on them.
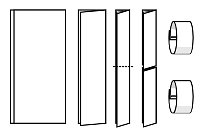
I take a sheet of tissue paper, and fold it in half lengthwise, and fold it in half lengthwise again. Then I cut the long strip into two halves, and staple each into a loop big enough to go around my thumb.
Anyway I had to make something so I could keep them with my notebook. I cut this out of thicker plastic which was still flexible It seems to work well, holding four tissue rings in place.
There is so much going on during the average day that I confine my sketching to times when there is little else I can do but sketch. At those times, sketching can be really rewarding.
That's why I value these simple and portable "devices" which allow me to immediately start sketching when I find myself in such situations.
Note about Amazon links: If you click on a link and buy something at Amazon, a few pennies per dollar goes into my Amazon account, so instead of letting Amazon keep it all, you can pry a few pennies from their fingers make them share it with me. Any other vendor links I may put on this website are just for your convenience.
|